

Most of us like to record a photographic memory of our mountain days. But some aspire to more than snapshots, seeking to capture that quintessential moment when all the elements of nature come together to form an image of ephemeral beauty. Taking great photos in the mountains is more than just lucky pointing and shooting - it's an attempt to capture the essence of a wild place that requires patience, planning and precision. I have enjoyed photographing the mountain landscape for a good part of the last thirty years, and it's the entire process that gives me utter satisfaction: from planning to the approach and from the waiting in solitude to finally pressing the shutter to create a record of that unique moment in time. Here are my Top 20 tips if you wish to take your mountain photography to the next level.

© Adrian Hendroff
"My interest in photography did not begin with books or mentors, or with any burning desire to see the world through a camera. It evolved from an intense devotion to mountains and wilderness that eventually shaped all the parts of my life and brought them together."
Galen Rowell

© Adrian Hendroff
Stay safe
Mountain photography is a rewarding activity but it does bring additional challenges. If you're a roadside or lowland photographer you're likely only a stone's throw away from a cafe or your car if the weather turns nasty. In the mountains this increases to several hours or even more, so the safety stakes are higher. Staying warm, dry and hydrated is paramount, as is being able to navigate in the dark or mist and negotiate steeper ground. In this article we're going to assume you're on walking terrain and at no immediate risk of falls. Keeping safe when photographing on steeper scrambling or climbing terrain is a different matter, and not one we're going into here.

© Adrian Hendroff
If you're not accustomed to being out in the mountains (this is a hillwalking site, but we all have to start somewhere), two big things to note are temperature and wind speeds. In the mountains, the temperature may decrease by as much as 1°C for every 100m you ascend, and wind strengths can be at least twice as strong for every 1000m height gain. So, if the mountain you are climbing is over 1000m and it is 10°C with a wind speed of 20km/h in the valley it can be close to freezing and blowing 40km/h on the summit. In general, wind speeds of 40km/h or more will make it awkward to manage a tripod, especially if you are standing somewhere exposed and if it's gusty. Precipitation is not likely to be such an issue, as you will probably not head out if it rains all day.

© Adrian Hendroff

© Adrian Hendroff
Invest in good mountain gear
A layered system is the key to regulating body temperature in the mountains: add a layer if you get cold, peel a layer off if it's too warm. Generally, you're looking at a base layer made from merino wool or synthetics (avoid cotton as it has no wicking action), a fleece-based mid layer and a waterproof/windproof outer layer. A down jacket is also useful to keep out the cold when you're stood rooted at a spot waiting for the light. In essence, knowing how many layers you need based on the mountain weather forecast can be helpful. For example, if I'm shooting the sunset in early autumn and the forecast is dry with temperatures ranging from 8-12°C, I'd wear a base layer and a fleece while packing a down jacket to use when it's dark.
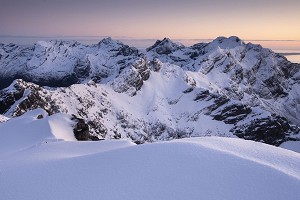
The quality of light is best when the sun is low on the horizon, giving a three-dimensional feel to the scene and revealing the shape, form and texture of the landscape
Footwear can range from approach shoes for trails to boots with good ankle support for the more demanding mountains. For all year round use on mountains in the British Isles, I prefer 3-4 season leather boots.
In the mountains, there is a tendency for the temperature to drop rapidly and this results in cold extremities as the body moves heat to the core. Always wear good socks and carry a beanie hat, neck gaiter/balaclava and gloves – no harm packing spares too. For gloves to wear whilst photographing I recommend getting ones with flip finger flaps to allow you to operate your camera.
A headtorch with a decent beam is invaluable while mountain navigating in the dark. An emergency whistle is a must. I mainly use a paper map but also carry a GPS as a backup if I need to suss out my location quickly. Last but not least always carry a compass and know how to use it. Keep it well away from anything that's metal, and that includes most of your camera equipment and mobile phone.
If hiking in the summer, then I'd also pack a midge net and spray. In the winter, if there is snow or ice on the mountains, you'd need to and carry additional equipment such as crampons, an ice axe, hand warmers, ski goggles, a bivvy shelter, and gaiters.

© Adrian Hendroff
Suss out your camera gear
The general rule for off-road photography: keep your camera kit as simple as possible and pack as light as you can.
However, this is easier than it sounds as most landscape photographers will carry a few lenses to cover all the focal lengths such as 16-35mm, 24-70mm and 70-300mm. For me, unless if I have a specific shot in mind, I will only take one or two lenses if the hike is more than four hours in total.

© Adrian Hendroff
The 24-70mm is a workhorse of a lens and I normally carry that. If you need to take a telephoto lens it is a heavy piece of kit, with most of them weighing around 1-1.8kg. However, you'll find a number of compact telephoto lenses such as Canon EF 70-300mm f/4-5.6 IS II USM (710g), Nikon AF-P 70-300mm f/4.5-5.6E ED VR (680g) and Sony E 70-350mm f/4.5-6.3 G OSS (625g) – these all offer a good compromise from a weight perspective when compared to heavier counterparts. If you're carrying more than one lens, having a belt system (I use ThinkTank) and pouches to store your lenses around your waist will make it more efficient when swapping lenses.
If you're serious about your photography, then you'll need to invest in a DSLR or mirrorless camera, with some preferring to go for the latter option as it is lighter. Don't go overboard with your choice of filters: I'd definitely carry a polariser to make the colours pop, and besides that a 3 stop Soft or Medium Grad.
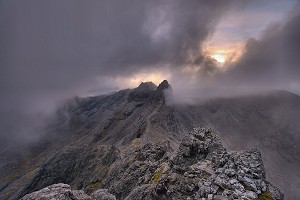
a spell of bad weather on the mountain does not always translate to a lack of photographic opportunities
Carbon-fibre tripods are the lightest on the market but they will also withstand the wind - brands such as Gitzo, Benro or Manfrotto come recommended. I always use an L-bracket as that saves a lot of time switching my camera from a landscape to portrait orientation whilst using a tripod.
As cold conditions in the mountains will drain your batteries quickly, always remember to carry spares; there's no harm throwing in a spare memory card too. Make sure your headtorch and all your camera batteries are fully charged the night before. Clean all your lenses and filters the night before, but always pack a lens cloth too.
Pack smart
I strongly advise packing your rucksack the night before, and do it in the order you'll use your kit. I store all my kit in multiple dry bags of different colours so I know what's in what and I throw all these dry bags into one of a larger size. I also carry a spare dry bag that's large enough to wrap around my camera and longest lens (while mounted on a tripod) in the event of a passing shower.

© Adrian Hendroff
Watch the weather
Knowing when to go for it is important in mountain photography, this will save you a lot of wasted time and effort. To reduce the likelihood of returning empty handed with no quality photographs to show for, it is imperative that you use a reliable source for weather forecasting. I generally don't rely on any weather apps as I find they are not updated as often. It is important to catch the latest update particularly for us living in the British Isles, as the weather is often dominated by westerlies that track across the Atlantic. I use a Norwegian website called yr.no which gives me reliable weather data on an hour-by-hour basis, especially on cloud cover. For the best results, you'll have to put in the mountain in question into its search bar, for example Moel Siabod and not Capel Curig.
For the best colours over the golden hour at either end of the day, aim for a reasonable amount of middle to high cloud cover and ideally very little or no low clouds. For example, something like 10% low, 33% middle and 80% high will give good colours. On the other hand, if you see 100% low, 75% middle and 66% high it will not be worth going for it.
The period between cold fronts, when passing showers are interspersed with spells of sunshine, will result in dramatic cloud and light conditions, and sometimes even rainbows. Distant stormy skies can also enhance the mood of your images, so a spell of bad weather on the mountain does not always translate to a lack of photographic opportunities.

© yr.no
Have a plan
A reconnaissance of your chosen mountain area is a good idea. Gather information about the area, its most scenic locations, allowed access points and escape routes. How long will it take you to get there? What are the potential hazards? If out at sunrise or sunset, can you navigate there or back competently in the dark?
The more you know about an area the easier it is to decide where and what direction to shoot from. Create a location spreadsheet in Excel listing the best month of the year to shoot for the best light - use The Photographer's Ephemeris or PhotoPills to work this out. The position of the sun at dawn and dusk is important. The sun doesn't always rise in the east, nor does it always set in the west! In mid-summer, it rises to the northeast and sets northwest whilst in mid-winter it rises to the southeast and sets southwest. The height of the sun during the different seasons and time of day is also useful to know. Finally, are there any mountains in the vicinity that will block the light as the sun rises or sets in the direction you're shooting?

© Photo Ephemeris
For a mountain hike with camera equipment, I normally give myself 4km/h hour on flat ground and 2-3km/h on steeper terrain. I plan to arrive ahead of time at a location so I can take it all in while waiting for the light show to start. I'll have a snack and a drink, put on an extra layer if needed and have a look at my surroundings to suss out potential compositions. I'll then get my camera out and work out what focal lengths I need before I even get it mounted on a tripod or put any filters on.

© Adrian Hendroff
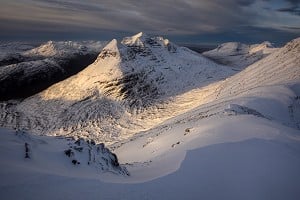
Chase the light
In the mountains, always seek to shoot what is not there, rather than what is there. The mountain landscape is permanent, but light conditions are transient. Waiting for the right moment, for the perfect interplay of light and shadows can result in that standout image.
Over the golden hour - the hour after sunrise or before sunset - the light on land and sky is diffused and more dramatic. The low sun casts shadows on the landscape, accentuating its features and at the same time bathing it in a golden glow. Don't just restrict yourself to the golden hour; if conditions are good, colours in the sky will appear at dawn or linger long into dusk. In Nordic countries such as Iceland, summer is the perfect time to enjoy mountain landscapes under the midnight sun when the golden hour can stretch for several hours.
The quality of light is best when the sun is low on the horizon and illuminates the mountain landscape at roughly a 90° angle. This will give a three-dimensional feel to the scene and will reveal shape, form and texture of the landscape.
Finally, look also in the opposite direction – any clouds there will pick up colours as the sun starts to rise or set. The colours are generally more vivid over the winter months, but late autumn and early spring can be good too.

© Adrian Hendroff
Add a splash of seasonal colour
Colour is a powerful emotive element in photography, especially if used in contrast or harmony with your composition. In the mountains, you'll find plenty of opportunities to incorporate seasonal colour to brighten up your foreground.
Spring is a colourful season in the British Isles, with daffodils and rhododendrons starting to bloom in late March or April. Come May, there will be more colour in the foothills with bluebells, wild garlic, hawthorn, rowan and foxglove beginning to blossom. Cliff-tops of mountains fringed by the sea will be lined with clumps of pink and white brought on by flowering sea thrift and campion.
In the Alps and Dolomites, summer is a perfect time to roam mountain meadows when carpets of wildflowers are in bloom – these will contrast beautifully with any snow-capped peaks. In Nordic countries such as Iceland and Norway, lupine flowers also blanket much of the country in a sea of vibrant purple, pink and white blossoms.
In the British Isles, the summer landscape turns a lush green, with bracken and heather aplenty on the hillside. You'll also find buttercups, cotton grass and sundew adding colour to mountain valleys. By the time August arrives, the heather will bloom and adorn the slopes with a sea of pink and purple hues, with gorse patches adding a splash of yellow to the mix. The red pomes on hawthorn trees also ripen in August. Come October, the bracken turns russet-brown, and later in the month the leaves on deciduous trees such as oak, beech, birch and maple also change colour, with vibrant hues of yellow, orange, red and brown.

© Adrian Hendroff
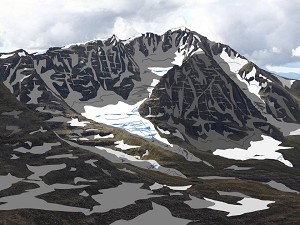
Seek landscape layers
One of the things to look out for are 'layers' in the landscape, these are essentially made up of a range of distant mountains that lead away from the eye. In order to shoot these layers, you'll need a telephoto lens as this will allow you to compress the perspective, shortening the distance between near and far subjects within a scene – effectively making shapely mountains look all the more dramatic.
The best time to shoot these landscape layers is at dawn or dusk as light travels at an angle which casts long shadows as it breaks over each layer. The layers now show up as a gradient of tones, with every contour and shape emphasised by silhouettes that add atmosphere, depth and contrast.
Backlit skies, where the sun is behind the subject, are preferable. Given the right conditions, you'll get pink, orange or yellow colours in the sky at dawn or dusk. Over this time, point your camera toward the source of light. If your lens can't auto focus due to low light levels, you'll need to manually focus. In most cases, there is no need for any ND grad filters but use a polariser to make the colours pop.

© Adrian Hendroff
Shoot fresh viewpoints
Rather than photographing a mountain scene in a way it is typically done, seek out new viewpoints for originality. Sometimes the best photo isn't from the summit, it can be from a lower top, or from another mountain range across a valley or even from the roadside. You could include a picturesque corrie or rocky outcrop as foreground interest or include a dramatic ridge to lead the viewer's eye to the main peak. Experiment with different focal lengths too, don't rule out the use of a telephoto lens toward any distant peak if it portrays a unique profile of the mountain.

© Adrian Hendroff
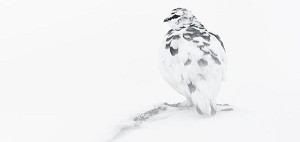
Chase mists and cloud inversions
Misty or foggy conditions are a photographer's dream. These typically happen in the late autumn or early spring when the temperature drops steeply and there is more moisture in the atmosphere. To maximise your chances, you'll need a mildly damp day followed by a clear, cold night. Early morning is best, even before sunrise when there is no wind and the dew point is a few degrees lower than the ground temperature.
Head to an elevated viewpoint above the mist or fog, to add to the mood and mystery of the scene. You'll get dark silhouettes and contrasting layers, giving your image a different dimension. From the elevated viewpoint, point your lens down to the valleys, over fields and large bodies of water. Use focal points such as castle ruins or a lone tree if there are any. A telephoto lens might help you to cherry-pick your subjects, especially if they are a long way away.
Cloud inversion layers also sometimes form during a spell of high pressure, especially over the winter months when warmer air from the sea moves over colder land, cooling and condensing as it does so. When conditions are calm, a still layer of cloud forms at or near ground level, with any upward movement of air restricted by the weak winter sun. Once above this layer, you will be looking down on a sea of clouds with peaks poking out of them.

© Adrian Hendroff
Capture fleeting moments of magic
While walking in the mountains, I'll always keep my 24-70mm attached to my camera and have that strapped around my chest. I also keep my compact 70-300mm in a lens pouch on my ThinkTank belt around my waist if I need to do a quick swap. Fleeting moments of magic, such as a rainbow, shaft of sunlight or a viewpoint framed by clouds, can sometimes occur unexpectedly, and you have to be quick to shoot them. Increase your ISO setting and shoot handheld instead of consuming time in setting up your tripod. If you're shooting handheld, the minimum shutter speed you should use is the inverse of the focal length you're shooting at. For example, at 50mm your shutter speed needs to be at least 1/50s. If you shoot at anything more than that, it will result in a blurry image.

© Adrian Hendroff
Shoot the Belt of Venus
Also known as Venus's Girdle or the anti-twilight arch, the Belt of Venus is a pinkish band that can be seen around 10° to 20° above the horizon due to the backscatter of reddish light from the sun. An elevated viewpoint high in the mountains is a perfect place to witness this atmospheric phenomenon which occurs during the civil twilight. It is strongest during winter months and you'll have to look in the opposite direction to the sun to see it. As twilight progresses, the glow is separated from the horizon by a dark band of the Earth's shadow.
Embrace the night sky
Don't just limit yourself to photographing mountains during the day or over the golden hour, but expand your horizons by shooting the night sky. On a clear, moonless night and away from light pollution, the mountains are a perfect place to photograph the Milky Way, star trails or the aurora. You'll need to invest in a lens that has an aperture of f2.8 or less, or learn to use a star tracker if you want to shoot longer exposures. A lightweight tracker such as ones made by Move Shoot Move are ideal to carry in the mountains.
Wales has several dark sky reserves recognised internationally, such as the Elan Valley. Dark skies in England can be found in Northumberland and the Yorkshire Dales. In Scotland, the northwest highlands are home to some of the darkest skies in the UK whilst over in Ireland, you'll find dark skies on nearly all of the mountain-tops along the west coast. Over on the continent, dark skies can be found in the Dolomites (Italy), Julian Alps (Slovenia), Tatra (Eastern Europe) and the French/Swiss Alps.
If you aspire to witness and photograph the aurora, your best bet is to head to one of the Nordic countries like Iceland (classics such as Kirkjufell and Vestrahorn mountain) or Norway (mountains in Lofoten and Senja) from September to March. In the British Isles, head north to the Scottish Highlands or if in Ireland to any mountain in Donegal or along the cliff-tops of the Causeway Coast in Northern Ireland.

© Adrian Hendroff
Add motion
Capturing motion can change the look and feel of an image, it will help to add to the mood and emotion you want to convey. In the mountains, you'll get this with flowing water - for example, the Fairy Pools on Skye or Steall Falls in Glen Nevis. In Ireland, Gleninchaquin Waterfall on the Beara Peninsula is a majestic sight after a spell of rain. Mountains that are close to the sea can also be excellent viewpoints to capture wild waves smashing against the rocks especially on windy days. Fast moving clouds can add a sense of motion to your images. In all cases, shoot with a shutter speed of half a second or more to give the water a trailing, milky effect. For clouds, use 10 seconds or more to get some movement.
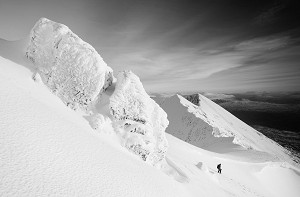
Use people for scale
The inclusion of a person amongst the surrounding landscape can help add a sense of scale to your image and helps the viewer to form an emotional connection with the scene. Keep the person (or people) small relative to the mountain or scene so the human figures do not distract from the overall composition. Sometimes an action shot of a hiker, mountain runner or climber can be more powerful than someone that is just standing and looking out at a mountain landscape. However, remember to keep your shutter speed to 1/100s or less to freeze motion and for your figure(s) to appear pin sharp.

© Adrian Hendroff
Shoot a panorama
In the mountains, we view the world by scanning our eye across the landscape. This is something a camera cannot do effectively if you shoot a single frame and the scene stretches across a large field of view. However, by stitching several frames into a panorama, you can take wider-angle photos than your widest lens will allow and also crop out areas of your frame that have no interest, for example if the upper half of the sky has no clouds or colours. To shoot a panorama, make sure your camera is level and shoot in portrait orientation to reduce distortion across the frames. Overlap each frame by roughly a third and take around 6-8 shots in total.
Add natural frames
This is when features in the landscape such as a rock arch or cliff edges are used to create a 'natural frame' in order to frame the view beyond and to lead the eye into an image. Mountain gullies are also good spots where you can find natural frames with rocky walls on either side.

© Adrian Hendroff
Seek out leading lines
Natural lines are everywhere in the mountain landscape - along a ridge, river, cliff edge or even clouds scudding over. Use these lines when composing an image as they lead the eye into the picture, adding depth and dynamism to the composition. Straight, converging lines are good but it's even better if an interesting object, such as an outcrop or tree, is placed at the end of the converging lines to give the eye something to settle on. 'S' shaped lines (such as a meandering river) are also good as this leads the eye gently through the entire image, allowing for it to take in the other elements of the composition.
Include foreground interest
A strong foreground adds depth to an image; it creates an 'entry point' for the eye, drawing one into the scene, and gives the composition a sense of scale and distance. A wide-angle lens helps in this respect, by enhancing objects in the foreground and stretching the view beyond. Also try to shoot from a lower perspective to avoid empty spaces in the middle distance.
About Adrian Hendroff
Adrian Hendroff is a published author, award-winning professional photographer, qualified Mountain Leader and an approved training provider with Mountaineering Ireland. He is also a member of the Mountain Training Association and Outdoor Writers & Photographers Guild. Based in Ireland, he also runs outdoor/astro photography workshops, and is a contributor to some of the most prominent media and magazine publications.
For more of Adrian's work and social media links, visit his website
UKH Articles and Gear Reviews by Adrian Hendroff
- 10 Great Walks in and Around the Mournes 11 Jun, 2018
- 10 Great Walks of Southwest Ireland 13 Aug, 2015
- Ireland in Winter 13 Feb, 2013


Comments
Very interesting article, thanks for this.
Incidentally, the link to Adrian's website at the end of it doesn't work for me either on Brave or Chrome.
There's a colon missing after https
Bingo, thanks.
Thanks: sorted